User Guide
Take a few minutes to read this. Here is everything you need to master GolemSix, organize your sessions and optimize your games on Rainbow Six Siege.
What is GolemSix?
GolemSix is your command center for Rainbow Six Siege. The goal is to stop scattering across different applications to manage strategies and availability. It is a tool designed specifically for teams who want to organize seriously.
Here, you can track your statistics, draw your attack plans, schedule attendance for your sessions and manage your team easily. No ads, no subscription. Just a tool made by a player, for players.
A passion project
GolemSix is completely free. The idea is simply to provide the R6 community with the ideal tool to structure their game.
The Home Page
The home page centralizes essential information for your team. You will find the Rainbow Six Siege server status for each platform, a news feed from official X accounts and the latest YouTube videos from the community.
Official Ubisoft patch notes are also directly accessible to keep you updated on the latest balancing changes and game updates.
Global View vs Group View
This is the core mechanic to understand. On the Sessions, Strategies, or Leaderboard pages, you will find a selector allowing you to change the view of the current page.
Modifying your view allows you to filter the information on the page based on global visibility or the visibility of a group.
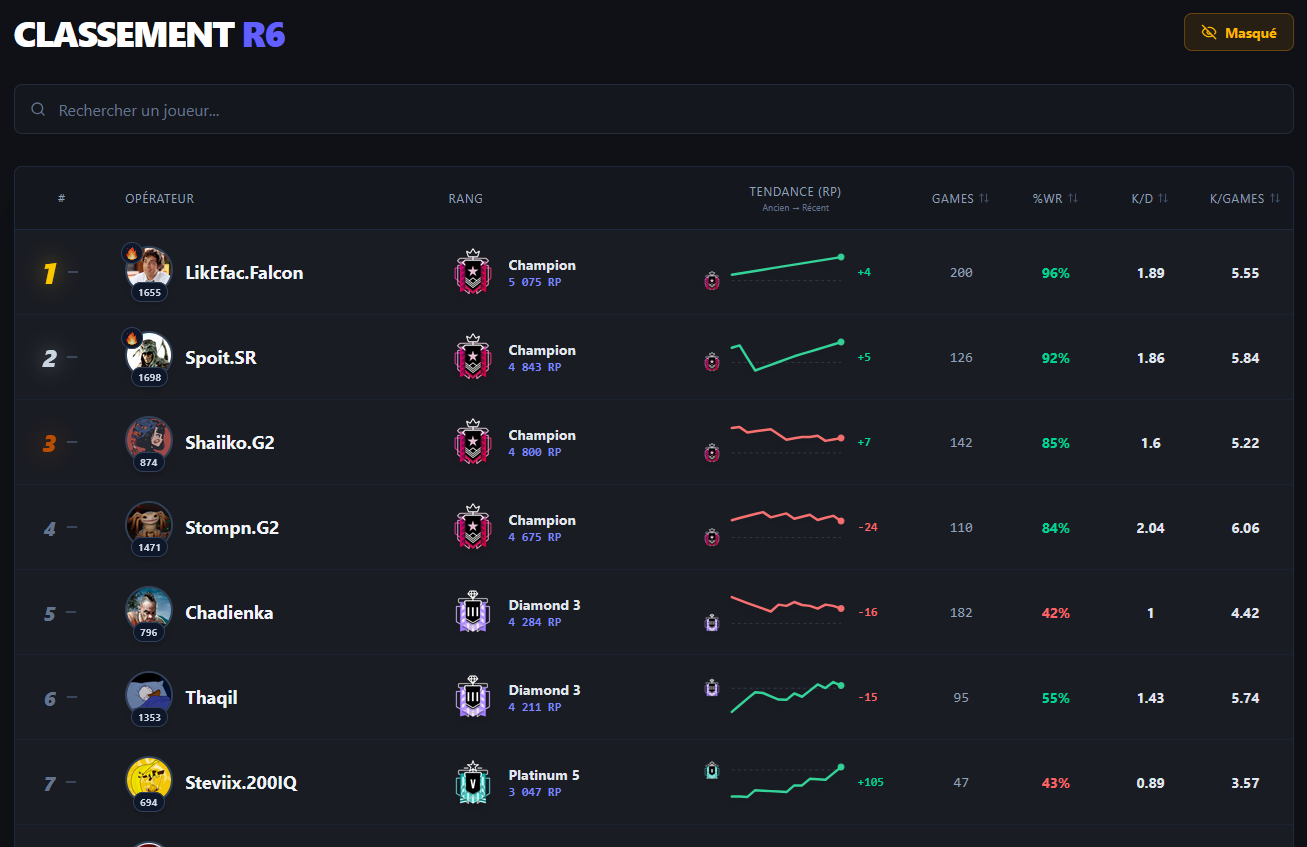
The Leaderboard
The site fetches your real statistics directly from Ubisoft. Your rank, kill ratio, win rate and match count update automatically with each sync.
You can use the search bar to find a specific player and navigate easily through the results thanks to pagination. A manual refresh button allows you to sync the statistics of all players in the table at once.
In group view, you can add external players to compare your performance with players outside your team. Mini-graphs also display your statistics trends to track your progress.
You maintain full control over your privacy by choosing to hide or display your profile in the global leaderboard from your settings.
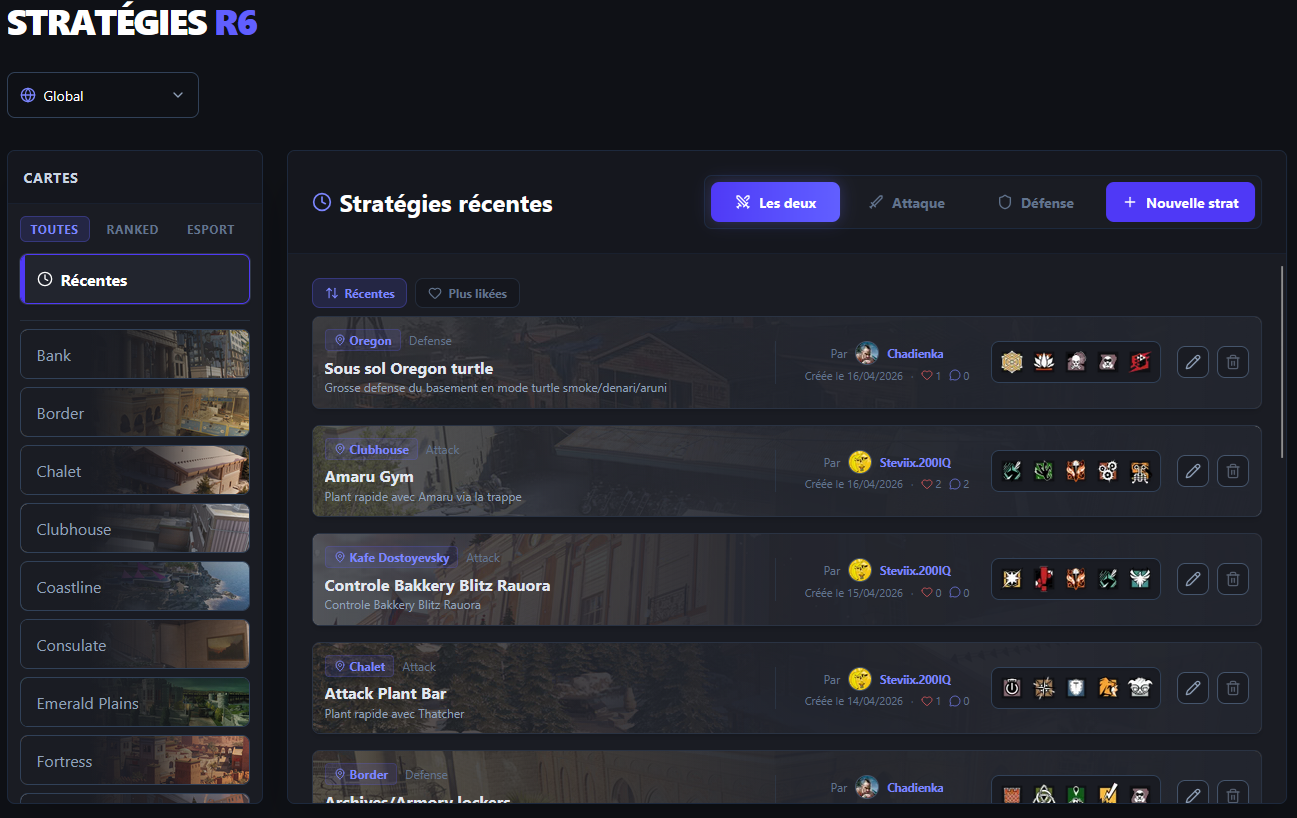
Strategies
A victory is prepared. A strategy allows you to define your action plan in advance for a specific map and site. You can add a title, a summary and a detailed description of your execution.
Each strategy has its own details page. You will find the integrated video player, the interactive tactical plan viewer, the operator list and a full-screen image gallery.
A discussion space is available under each strategy to exchange with your team via comments and nested replies. You can also mark your approval with the like button.
Tactical Plans
The plans page lists all your tactical creations. You can filter your plans by map, search by name or create new ones. Each plan card displays the side, the bomb site and the number of strategies it is linked to.
The list uses infinite scrolling to facilitate navigation. From this interface, you can directly access the editor to modify your drawings, delete a plan or manage its links with your strategies.
The Tactical Plan Editor
Accessible via the button Editor, it is the heart of GolemSix. You can draw on the actual in-game plans, place your operators, mark rotations and prepare your deployment precisely.
We will detail each tool so you are operational immediately.
Overview
The interface is divided into two main parts. On the left is your work area called the canvas, and on the right the Squad panel. Your toolbar is located at the very bottom.
The Canvas
This is where you work. The detailed floor plan displays destructible walls with yellow rectangles, as well as hatches. The bomb zones are clearly visible in yellow.
Use your mouse wheel to zoom, and hold right-click to pan.
The Counters
At the top left, three counters help you track your placements in real time:
- Reinforcements : the number of walls you have reinforced across the whole map. Limited to 10.
- Drones : the number of drones deployed for information gathering. Limited to 10.
- Defuser : only one defuser available to place.
If you reach the limit, the counter turns red to warn you.
Zoom Controls
You also have a dedicated zoom panel at the top right:
- The Plus button to zoom in.
- The current percentage, which you can click to reset to 100%.
- The Minus button to zoom out.
- The circular arrow to re-center your view.
The Toolbar
At the bottom of your screen, you will find your main toolbar. Here is what it contains from left to right:
Basic tools
Cursor
Select, move and resize elements placed on the plan.
Pen
Draw arrows and areas freely.
Eraser
Erase your lines.
Line
Draw a straight line between two points.
Arrow
Draw a directional arrow to indicate a movement or direction.
Utilities to place
Drone max 10
Place a drone.

Defuser max 1
Indicate the precise position of the defuser.
Rotation unlimited
Mark a rotation hole in a destructible wall.
Rotation Up unlimited
Mark a head-height rotation in a destructible wall.
Foot holes unlimited
Mark a foot hole in a destructible wall.

Up holes unlimited
Mark an up hole in a destructible wall.
Head holes unlimited
Mark a head hole in a destructible wall.
Breach unlimited
Prepare your essential openings for attack phases.
Plan management
Reinforce
Click on a destructible wall to reinforce it. It then appears in yellow. A second click cancels the action. You have 10 reinforcements in total.
Undo / Redo
Ctrl Z to undo the last action, Ctrl Y to redo it.
Clear all
Completely clear the floor of all its elements in one go. A confirmation will be requested.
Floor selector
Switch between different levels, from the basement to the ground floor or upper floors. Each level has its own drawings.
Save
The green button on the right. It is essential to click it to save your work before leaving the page.
Drawing options
When you select the Pen, the Eraser, the Line or the Arrow, an additional bar appears above with your stroke settings:
- 7 colors : choose between light blue, green, red, yellow, purple, white or black.
- 3 thicknesses : thin, medium or thick, to adapt to what you want to highlight.
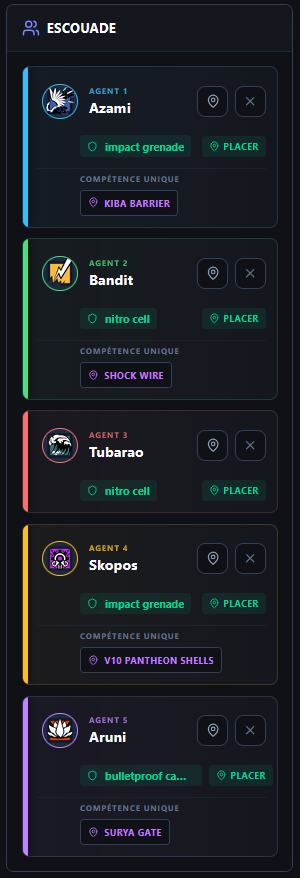
The Squad Panel
On the right, you manage your five-player team composition. Each slot corresponds to a role with a dedicated color:
For each operator, the functioning is as follows:
- Choose an operator : click on an empty slot or on the operator portrait to open the selection list.
- Add gadgets : assign up to two secondary equipment items. The button is located below the operator portrait.
- Unique ability : if the operator has a deployable equipment like Valkyrie or Kapkan, a purple button is displayed to place it.
- Place on map : click on the pin icon next to the portrait, then click on the map to position it.
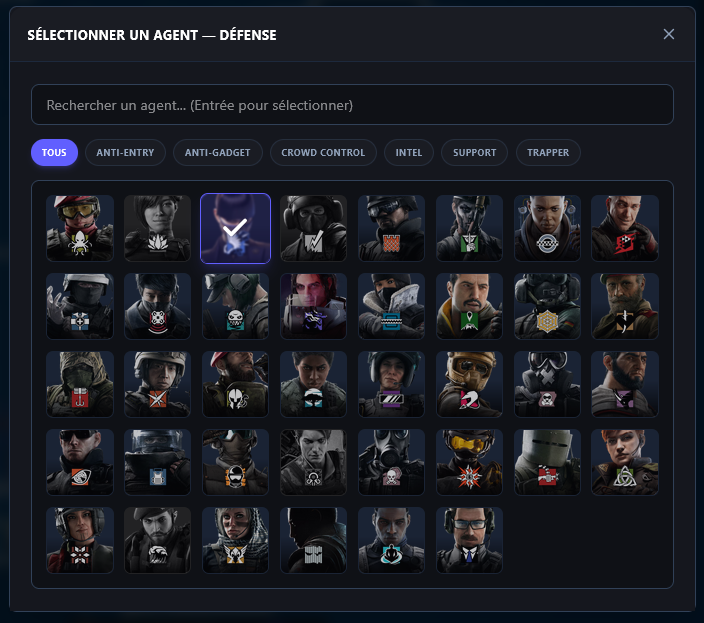
Operator Selection
The selection window shows you the full list of operators available for the side you are preparing.
The interface is optimized to be fast:
- A classic search bar. Start typing the name and press Enter to confirm.
- Quick filters based on specialties to easily find the necessary role.
- The portrait list. Those already selected by your teammates are grayed out to avoid duplicates.
Keyboard Shortcuts
To gain efficiency, the editor integrates many keyboard shortcuts. You can display this list at any time by hovering over the information icon at the bottom right of the screen.
Operators
Utilities
General
Pool your tactical plans
A well-built plan can serve as a basis for several different strategies. Prepare a clean and complete plan, and you can link it to as many strategies as needed later.
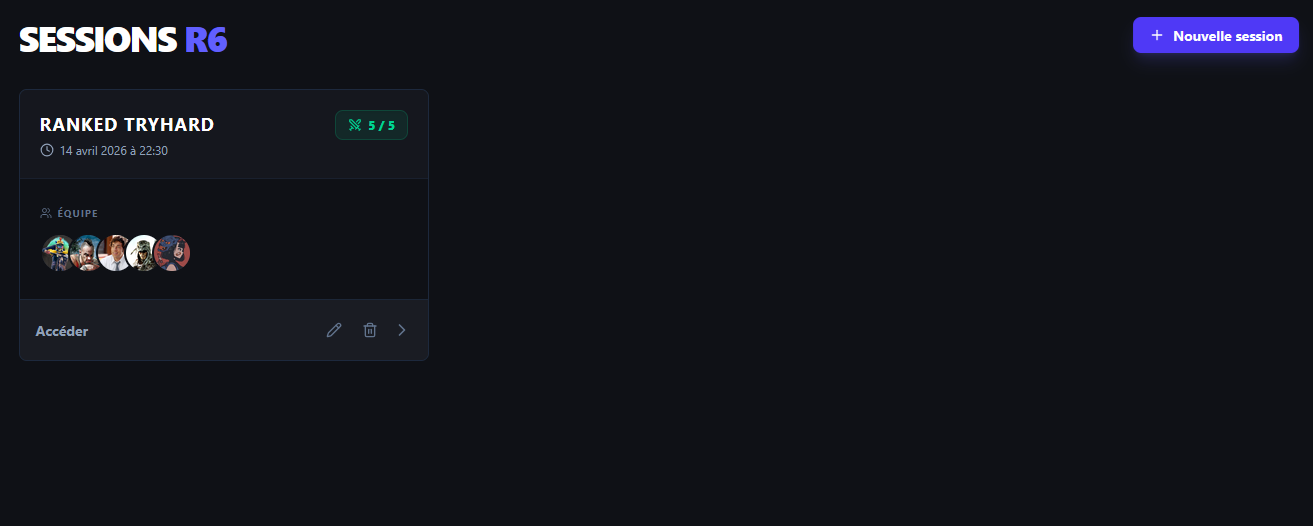
Sessions
No more endless polls to find out who is available. You create a session with a specific date and time, and each member indicates their availability in one click among three statuses: Present, Undecided or Absent.
Sessions can be unique or recurring. For recurring sessions, you choose the days of the week and the fixed time so that appointments are created automatically.
The details page displays the list of registered members separated between the starting team of five players and the bench. You can define the session visibility in global or group mode according to your needs.
It is necessary to have an account and be logged in to create or join a session.
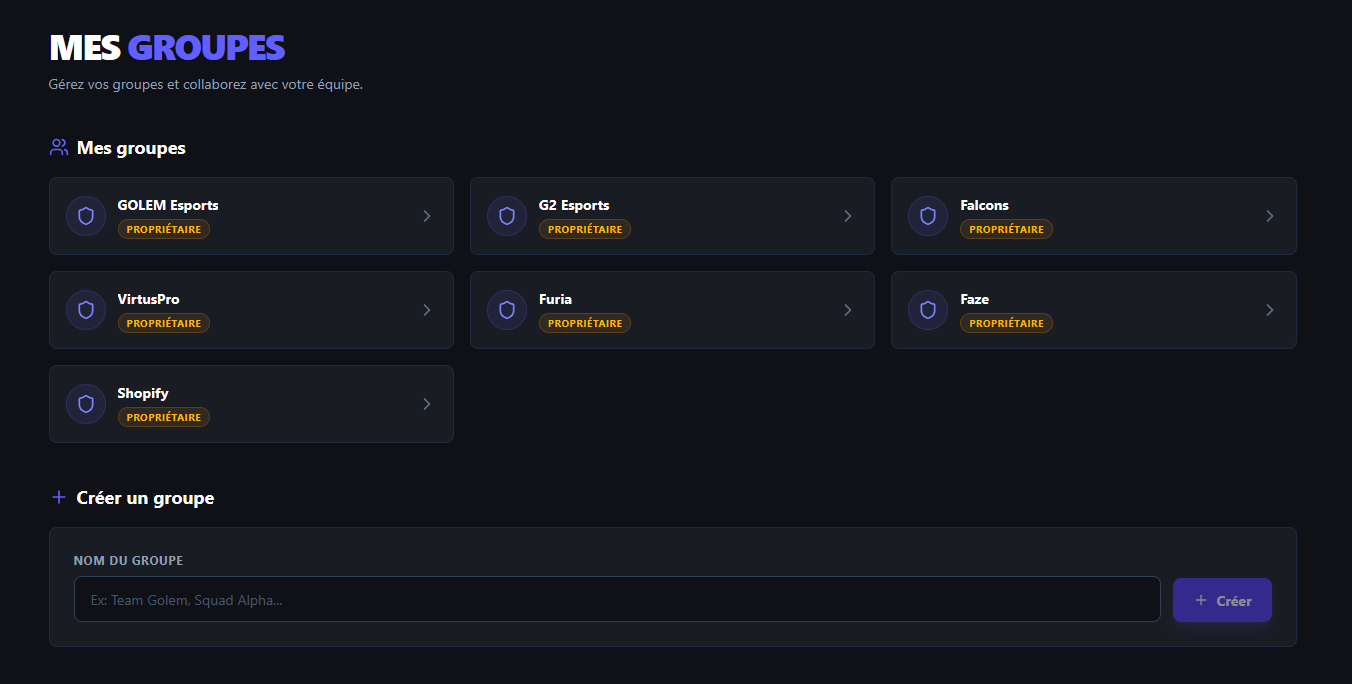
Groups
Each group has its own dashboard. It centralizes the list of members with their roles, recent strategies, upcoming sessions and quick links to team tools.
To invite teammates, simply search for their username. Invited users receive a notification with an indicator badge in their navigation bar.
Role management allows the owner to promote members to administrator rank, transfer ownership or remove members. Each member is free to leave a group at any time.
Profile
Your profile is your personal management space. You can view your detailed statistics synced from Ubisoft servers, change your password or modify your username to link another account.
It is also here that you manage your visibility on the global leaderboard. You have the possibility to export all your data by email in JSON format or permanently delete your account if you wish.